Saturday, August 15, 2020

Classes and Objects in C#

 Classes

A building block of an application. 


Anatomy of a class is,

1. Data (Represented by fields)

2. Behavior (Represented by methods/functions)


Declaring a class


Class Members

1. Instance - Accessible from an object
         
          var person = new Person();
          person.Introduce();

2. Static - Accessible from the class

         Console.WriteLine(); // Console is the class and WriteLine is a static method. 

    No need to create a object of Console class by using new operator in order to call WriteLine method. 

Objects

Object is a blue print of a class. Also called an instance of a class. It has an identity, attributes and behavior. 


Creating an Object

To create objects, we use "new" operator. By using objects, we can access class fields and methods. 


A Simple Class 


Thursday, June 25, 2020

How to fix for Fortify issue Open Redirect and Cross-Site Scripting: Poor Validation (URL_ENCODE)

Below are sample fixes for Fortify issue:
Open Redirect
Cross-Site Scripting: Poor Validation (URL_ENCODE)

Replace “Sink: Assignment to window.location”:
  window.location = theUrl;

with:
  var redirectUrl = window.urlUtil.getRedirectUrl(theUrl);
  if (redirectUrl) {
    window.location = redirectUrl;
  }

Add DOMPurify to _Layout.cshtml:
<script src="~/lib/dompurify/purify.min.js"></script>

Initialise trusted sites in e.g. _Layout.cshtml or site.js:
<script>
    "use strict";

    window.app.addTrustedSite('https://www.google.com');
    window.app.addTrustedSite('https://www.microsoft.com');
</script>

Add below js to a file e.g. site.js
"use strict";

(function () {

    var appService = {
        getPublicOrigin: getPublicOrigin,
        setPublicOrigin: setPublicOrigin,

        getTrustedSites: getTrustedSites,
        addTrustedSite: addTrustedSite,
    };

    window.app = appService;

    var publicOrigin = '/';
    var trustedSites = [];

    function getPublicOrigin() {
        return publicOrigin;
    }

    function setPublicOrigin(value) {
        publicOrigin = value;
    }

    function getTrustedSites() {
        return trustedSites;
    }

    function addTrustedSite(value) {
        if (value) {
            trustedSites.push(value);
        }
    }

})();

(function () {

    var urlService = {
        getRedirectUrl: getRedirectUrl,

        isRelative: isRelative,
        isWhitelisted: isWhitelisted,
    };

    window.urlUtil = urlService;

    function getRedirectUrl(url) {
        if (isRelative(url))
            return DOMPurify.sanitize(url);

        if (isWhitelisted(url))
            return DOMPurify.sanitize(url);

        return null;
    }

    function isRelative(url) {
        return url && url.match(/^\/[^\/\\]/);
    }

    function isWhitelisted(url) {
        url = url.toLowerCase();

        var whitelist = window.app.getTrustedSites();

        var i = whitelist.length;
        while (i--) {
            if (url.startsWith(whitelist[i])) {
                return true;
            }
        }
        return false;
    }

})();

Tuesday, June 23, 2020

Validate the Hostname or Domain Name

JS files

1. Add below method to get exact host name. 
function extractHostname(url) {
 var host = new URL(url).hostname;
    return host;
}

2. Use above method in the issue finding.  
            var domain = 'localhost'; //add exact domain name or IP address
            var loginUrl = 'define the login Url here';
            var currentUrl = $(location).attr("href");
            var host = extractHostname(currentUrl);
            if (host === domain)
           {
                $(location).attr("href", loginUrl + "?returnurl=" + currentUrl );
            } 
           else
           {
               alert("Invalid Return URL");
            }

.CS file

        private bool IsLocalUrl(string url)
        {
            if (string.IsNullOrEmpty(url))
            {
                return false;
            }
            else
            {
                return ((url[0] == '/' && (url.Length == 1 ||
                        (url[1] != '/' && url[1] != '\\'))) ||
                        (url.Length > 1 &&
                         url[0] == '~' && url[1] == '/'));
            }
        }

     if (IsLocalUrl(strRedirectUrl))
        {
           returnUrl = strRedirectUrl
         }

Monday, February 25, 2019

Regular Expressions

01- Special Characters except  ''-._,;:?!$/""\(\)  -  "^[\w\s''-._,;:?!$/""\(\)]*$"

02- Numeric Characters - "^$|^(-?\d+)(\.\d+)?$"

03- Email -  "^((([a-zA-Z]|\\d|[!#\\$%&'\\*\\+\\-\\/=\\?\\^_`{\\|}~])+(\\.([a-zA-Z]|\\d|[!#\\$%&'\\*\\+\\-\\/=\\?\\^_`{\\|}~])+)*))@((([a-zA-Z]|\\d)|(([a-zA-Z]|\\d)([a-zA-Z]|\\d|-|_|~)*([a-zA-Z]|\\d))))+(\\.(([a-zA-Z])|(([a-zA-Z])([a-zA-Z]|\\d|-|_|~)*([a-zA-Z])))+)+$"

04- Date (dd/mm/yyyy)  - "^(((0[1-9]|[12]\d|3[01])\/(0[13578]|1[02])\/((19|[2-9]\d)\d{2}))|((0[1-9]|[12]\d|30)\/(0[13456789]|1[012])\/((19|[2-9]\d)\d{2}))|((0[1-9]|1\d|2[0-8])\/02\/((19|[2-9]\d)\d{2}))|(29\/02\/((1[6-9]|[2-9]\d)(0[48]|[2468][048]|[13579][26])|((16|[2468][048]|[3579][26])00))))$"

05- Alphanumeric and underscore - "^\w" and "^a-zA-z_\d"

Thursday, October 11, 2018

Default and Custom Authorization Attribute in MVC

1. Default Authorization Attribute
The standard ASP.NET  MVC  project's  [Authorize] attribute is as below.
 [Authorize] 
 public class HomeController : Controller { 
   //....  
 } 
Also we can specify roles and users with  [Authorize] attribute.
 [Authorize(Users = "user1,user2")]  
 public class HomeController : Controller { 
   //....  
 } 
 [Authorize(Roles= "Admin")]  
 public class HomeController : Controller { 
   //....  
 } 
The AuthorizeAttribute Class is defined as:
 [AttributeUsageAttribute(AttributeTargets.Class|AttributeTargets.Method, Inherited = true,   
 AllowMultiple = true)]  
 public class AuthorizeAttribute : FilterAttribute,  
 IAuthorizationFilter  
 <>{  
 public AuthorizeAttribute()  
 {…}  
 protected virtual bool AuthorizeCore(HttpContextBase httpContext)  
 {…}  
 public virtual void OnAuthorization(AuthorizationContext filterContext)  
 <>{…}  
 protected void HandleUnauthorizedRequest(AuthorizationContext filterContext)  
 <>{…}  
 .  
 .  
 .  
 }
2. Custom Authorization Attribute
The class is derived from the AuthorizeAttribute class since the common behaviors are needed.
 using System.Web.Mvc;
 public class CustomAuthorizeAttribute : AuthorizeAttribute 
   { 
   protected override bool AuthorizeCore(HttpContextBase httpContext)
          {
            //Get the current user 
            if (httpContext.Request.IsAuthenticated && !string.IsNullOrEmpty(ApplicationContext.Current.UserId))
                return true;
            else
                return false;
          }
   protected override void HandleUnauthorizedRequest(AuthorizationContext filterContext)  
          {  
            filterContext.Result = new HttpUnauthorizedResult();  
          } 
    }

Below is the way we use the created CustomAuthorize attribute.
 [CustomAuthorize] 
 public class HomeController : Controller { 
   //....  
 } 
If you need to add roles or users with the above Custom Attribute , just add the constructor to the CustomAuthorizeAttribute class with the roles/ users as params and define the role names above in the action method, controller.
   private readonly string[] allowedroles; 
   public CustomAuthorizeAttribute(params string[] roles)  
   {  
      this.allowedroles = roles;  
   }  
   //Then check the current user is in the allowedroles.
And use the created custom attribute in your action method as below.
 [CustomAuthorize(Roles= "Admin")]  
 public class HomeController : Controller { 
   //....  
 } 

Tuesday, April 4, 2017

Format Date in SharePoint Calender Custom Display Form

I wanted to change the date format "2017-04-04T09:00:00Z" to "04/04/2017 , 09:00 AM" in SharePoint calendar custom display form.I followed below steps.

1. Open the site in SharePoint designer and click on the "Lists and Libraries".

2. Select the Calendar List which you need to format the date.

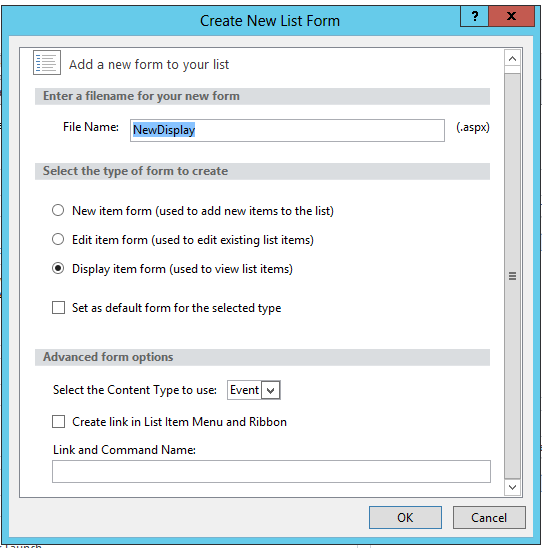
3.Under the form section, click on the "New" to create new Display form.

4.Then create a new Display form.


5. In created display form , find below code snippet.
          <tr>  
             <td width="190px" valign="top" class="ms-formlabel">  
               <H3 class="ms-standardheader">  
                 <nobr>Start Time</nobr>  
               </H3>  
             </td>  
             <td width="400px" valign="top" class="ms-formbody">  
               <xsl:value-of select="@EventDate"/>  
             </td>  
           </tr>  
           <tr>  
             <td width="190px" valign="top" class="ms-formlabel">  
               <H3 class="ms-standardheader">  
                 <nobr>End Time</nobr>  
               </H3>  
             </td>  
             <td width="400px" valign="top" class="ms-formbody">  
               <xsl:value-of select="@EndDate"/>  
             </td>  
           </tr>  
6. Replace it with below code.
             <td width="190px" valign="top" class="ms-formlabel">  
               <H3 class="ms-standardheader">  
                 <nobr>Start Time</nobr>  
               </H3>  
             </td>  
             <td width="400px" valign="top" class="ms-formbody">          
               <xsl:value-of select="msxsl:format-date(@EventDate, 'dd/MM/yyyy')"/> ,  
               <xsl:value-of select="msxsl:format-time(@EventDate, 'hh:mm tt')"/>  
             </td>  
           </tr>  
           <tr>  
             <td width="190px" valign="top" class="ms-formlabel">  
               <H3 class="ms-standardheader">  
                 <nobr>End Time</nobr>  
               </H3>  
             </td>  
             <td width="400px" valign="top" class="ms-formbody">  
               <xsl:value-of select="msxsl:format-date(@EndDate, 'dd/MM/yyyy')"/> ,  
               <xsl:value-of select="msxsl:format-time(@EndDate, 'hh:mm tt')"/>  
             </td>  
           </tr>  
7.You can use any date  and time format for the  'dd/MM/yyyy' ,'hh:mm tt'

Wednesday, December 21, 2016

Upload Files to SharePoint Document Library in c#

1.Create a seperate class for the SharePoint upload called "SharePointUtil". And include below two methods.

 Connect to the server. Url is the site URL.
 public bool Connect(string Url)  
 {  
 bool bConnected = false;  
 try  
 {  
 SPClientContext = GetSPContext(Url);  
 SPWeb = SPClientContext.Web;  
 SPClientContext.Load(SPWeb);  
 SPClientContext.ExecuteQuery();  
 bConnected = true;  
 }  
 catch (Exception ex)  
 {  
 bConnected = false;  
 SPErrorMsg = ex.Message;  
 }  
 return bConnected;  
 }  
 private ClientContext GetSPContext(string Url)  
 {  
 ClientContext SPClientContext = new ClientContext(Url);  
 SecureString SecSPassWord = new SecureString();  
 foreach (char c in sPPassword)  
 {  
 SecSPassWord.AppendChar(c);  
 }  
 SPClientContext.Credentials = new SharePointOnlineCredentials(sPUserName, SecSPassWord);  
 return SPClientContext;  
 }  

Upload a File to SharePoint
fs means File Stream
sFileName means File Name
sSPSiteRelativeURL means Relative Path
sLibraryName means Document Library Name
fileid means File ID
applicationtype means Type of the Application


 public void UploadFile(Stream fs, string sFileName, string sSPSiteRelativeURL, string fileid, string applicationtype)  
 {  
 string sDocName = string.Empty;  
 string folderpath = string.Empty;  
 try  
 {  
 if (SPWeb != null)  
 {  
 string sLibraryName = "Test";  
 var fullFolderUrl = applicationtype + "/" + fileid;  
 var list = SPWeb.Lists.GetByTitle(sLibraryName);  
 var rootfolder = list.RootFolder;  
 //Here you can create the folders in document library.  
 CreateFolder(fullFolderUrl, rootfolder);  
 var fUrl = sSPSiteRelativeURL + sLibraryName + "/" + fullFolderUrl + "/" + sFileName;  
 Microsoft.SharePoint.Client.File.SaveBinaryDirect(SPClientContext, fUrl, fs, true);  
 }  
 }  
 catch (Exception ex)  
 {  
 sDocName = string.Empty;  
 SPErrorMsg = ex.Message;  
 }  
 }  

Creating a folder and named the file id
fullFolderUrl means Folder Url
parentFolder means parent Folder
CurrentURL means Current URL


 public Folder CreateFolder(string fullFolderUrl, Folder parentFolder)  
 {  
 string folderpath = string.Empty;  
 string UploadUrl = sURL;  
 if (string.IsNullOrEmpty(fullFolderUrl))  
 throw new ArgumentNullException("fullFolderUrl");  
 var folderNames = fullFolderUrl.Split(new char[] { '/' }, StringSplitOptions.RemoveEmptyEntries);  
 string folderName = folderNames[0];  
 var curfolder = parentFolder.Folders.Add(folderName);  
 SPClientContext.Load(curfolder);  
 SPClientContext.ExecuteQuery();  
 // If we have sub folders  
 if (folderNames.Length > 1)  
 {  
 var subFolderUrl = string.Join("/", folderNames, 1, folderNames.Length - 1);  
 return CreateFolder(subFolderUrl, curfolder);  
 }  
 return curfolder;  
 }  

2.Use the below method where click on the "upload" button.

 private void UploadFilestoSharePoint(Stream fs, string sFileName, Guid id, string filetype)  
 {  
 string fileid = id.ToString();  
 // if you want to specialize the application type  
 string applicationtype = filetype;  
 //This is the SharePoint Web url eg "https://test.sharepoint.com"   
 string UploadUrl = sURL;  
 Uri uri = new Uri(UploadUrl);  
 string sSPSiteRelativeURL = uri.AbsolutePath;  
 SharePointUtil sputil = new SharePointUtil();  
 bool bbConnected = sputil.Connect(UploadUrl);  
 if (bbConnected)  
 {  
 sputil.UploadFile(fs, sFileName, sSPSiteRelativeURL, fileid, applicationtype);  
 }  
 }