Thursday, October 11, 2018

Default and Custom Authorization Attribute in MVC

1. Default Authorization Attribute
The standard ASP.NET  MVC  project's  [Authorize] attribute is as below.
 [Authorize] 
 public class HomeController : Controller { 
   //....  
 } 
Also we can specify roles and users with  [Authorize] attribute.
 [Authorize(Users = "user1,user2")]  
 public class HomeController : Controller { 
   //....  
 } 
 [Authorize(Roles= "Admin")]  
 public class HomeController : Controller { 
   //....  
 } 
The AuthorizeAttribute Class is defined as:
 [AttributeUsageAttribute(AttributeTargets.Class|AttributeTargets.Method, Inherited = true,   
 AllowMultiple = true)]  
 public class AuthorizeAttribute : FilterAttribute,  
 IAuthorizationFilter  
 <>{  
 public AuthorizeAttribute()  
 {…}  
 protected virtual bool AuthorizeCore(HttpContextBase httpContext)  
 {…}  
 public virtual void OnAuthorization(AuthorizationContext filterContext)  
 <>{…}  
 protected void HandleUnauthorizedRequest(AuthorizationContext filterContext)  
 <>{…}  
 .  
 .  
 .  
 }
2. Custom Authorization Attribute
The class is derived from the AuthorizeAttribute class since the common behaviors are needed.
 using System.Web.Mvc;
 public class CustomAuthorizeAttribute : AuthorizeAttribute 
   { 
   protected override bool AuthorizeCore(HttpContextBase httpContext)
          {
            //Get the current user 
            if (httpContext.Request.IsAuthenticated && !string.IsNullOrEmpty(ApplicationContext.Current.UserId))
                return true;
            else
                return false;
          }
   protected override void HandleUnauthorizedRequest(AuthorizationContext filterContext)  
          {  
            filterContext.Result = new HttpUnauthorizedResult();  
          } 
    }

Below is the way we use the created CustomAuthorize attribute.
 [CustomAuthorize] 
 public class HomeController : Controller { 
   //....  
 } 
If you need to add roles or users with the above Custom Attribute , just add the constructor to the CustomAuthorizeAttribute class with the roles/ users as params and define the role names above in the action method, controller.
   private readonly string[] allowedroles; 
   public CustomAuthorizeAttribute(params string[] roles)  
   {  
      this.allowedroles = roles;  
   }  
   //Then check the current user is in the allowedroles.
And use the created custom attribute in your action method as below.
 [CustomAuthorize(Roles= "Admin")]  
 public class HomeController : Controller { 
   //....  
 } 

Tuesday, April 4, 2017

Format Date in SharePoint Calender Custom Display Form

I wanted to change the date format "2017-04-04T09:00:00Z" to "04/04/2017 , 09:00 AM" in SharePoint calendar custom display form.I followed below steps.

1. Open the site in SharePoint designer and click on the "Lists and Libraries".

2. Select the Calendar List which you need to format the date.

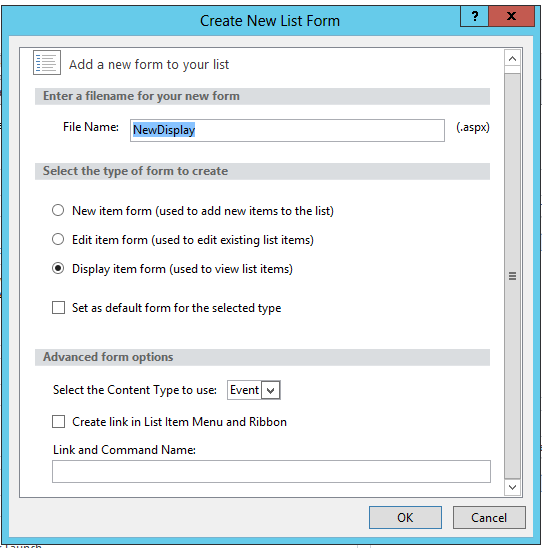
3.Under the form section, click on the "New" to create new Display form.

4.Then create a new Display form.


5. In created display form , find below code snippet.
          <tr>  
             <td width="190px" valign="top" class="ms-formlabel">  
               <H3 class="ms-standardheader">  
                 <nobr>Start Time</nobr>  
               </H3>  
             </td>  
             <td width="400px" valign="top" class="ms-formbody">  
               <xsl:value-of select="@EventDate"/>  
             </td>  
           </tr>  
           <tr>  
             <td width="190px" valign="top" class="ms-formlabel">  
               <H3 class="ms-standardheader">  
                 <nobr>End Time</nobr>  
               </H3>  
             </td>  
             <td width="400px" valign="top" class="ms-formbody">  
               <xsl:value-of select="@EndDate"/>  
             </td>  
           </tr>  
6. Replace it with below code.
             <td width="190px" valign="top" class="ms-formlabel">  
               <H3 class="ms-standardheader">  
                 <nobr>Start Time</nobr>  
               </H3>  
             </td>  
             <td width="400px" valign="top" class="ms-formbody">          
               <xsl:value-of select="msxsl:format-date(@EventDate, 'dd/MM/yyyy')"/> ,  
               <xsl:value-of select="msxsl:format-time(@EventDate, 'hh:mm tt')"/>  
             </td>  
           </tr>  
           <tr>  
             <td width="190px" valign="top" class="ms-formlabel">  
               <H3 class="ms-standardheader">  
                 <nobr>End Time</nobr>  
               </H3>  
             </td>  
             <td width="400px" valign="top" class="ms-formbody">  
               <xsl:value-of select="msxsl:format-date(@EndDate, 'dd/MM/yyyy')"/> ,  
               <xsl:value-of select="msxsl:format-time(@EndDate, 'hh:mm tt')"/>  
             </td>  
           </tr>  
7.You can use any date  and time format for the  'dd/MM/yyyy' ,'hh:mm tt'

Wednesday, December 21, 2016

Upload Files to SharePoint Document Library in c#

1.Create a seperate class for the SharePoint upload called "SharePointUtil". And include below two methods.

 Connect to the server. Url is the site URL.
 public bool Connect(string Url)  
 {  
 bool bConnected = false;  
 try  
 {  
 SPClientContext = GetSPContext(Url);  
 SPWeb = SPClientContext.Web;  
 SPClientContext.Load(SPWeb);  
 SPClientContext.ExecuteQuery();  
 bConnected = true;  
 }  
 catch (Exception ex)  
 {  
 bConnected = false;  
 SPErrorMsg = ex.Message;  
 }  
 return bConnected;  
 }  
 private ClientContext GetSPContext(string Url)  
 {  
 ClientContext SPClientContext = new ClientContext(Url);  
 SecureString SecSPassWord = new SecureString();  
 foreach (char c in sPPassword)  
 {  
 SecSPassWord.AppendChar(c);  
 }  
 SPClientContext.Credentials = new SharePointOnlineCredentials(sPUserName, SecSPassWord);  
 return SPClientContext;  
 }  

Upload a File to SharePoint
fs means File Stream
sFileName means File Name
sSPSiteRelativeURL means Relative Path
sLibraryName means Document Library Name
fileid means File ID
applicationtype means Type of the Application


 public void UploadFile(Stream fs, string sFileName, string sSPSiteRelativeURL, string fileid, string applicationtype)  
 {  
 string sDocName = string.Empty;  
 string folderpath = string.Empty;  
 try  
 {  
 if (SPWeb != null)  
 {  
 string sLibraryName = "Test";  
 var fullFolderUrl = applicationtype + "/" + fileid;  
 var list = SPWeb.Lists.GetByTitle(sLibraryName);  
 var rootfolder = list.RootFolder;  
 //Here you can create the folders in document library.  
 CreateFolder(fullFolderUrl, rootfolder);  
 var fUrl = sSPSiteRelativeURL + sLibraryName + "/" + fullFolderUrl + "/" + sFileName;  
 Microsoft.SharePoint.Client.File.SaveBinaryDirect(SPClientContext, fUrl, fs, true);  
 }  
 }  
 catch (Exception ex)  
 {  
 sDocName = string.Empty;  
 SPErrorMsg = ex.Message;  
 }  
 }  

Creating a folder and named the file id
fullFolderUrl means Folder Url
parentFolder means parent Folder
CurrentURL means Current URL


 public Folder CreateFolder(string fullFolderUrl, Folder parentFolder)  
 {  
 string folderpath = string.Empty;  
 string UploadUrl = sURL;  
 if (string.IsNullOrEmpty(fullFolderUrl))  
 throw new ArgumentNullException("fullFolderUrl");  
 var folderNames = fullFolderUrl.Split(new char[] { '/' }, StringSplitOptions.RemoveEmptyEntries);  
 string folderName = folderNames[0];  
 var curfolder = parentFolder.Folders.Add(folderName);  
 SPClientContext.Load(curfolder);  
 SPClientContext.ExecuteQuery();  
 // If we have sub folders  
 if (folderNames.Length > 1)  
 {  
 var subFolderUrl = string.Join("/", folderNames, 1, folderNames.Length - 1);  
 return CreateFolder(subFolderUrl, curfolder);  
 }  
 return curfolder;  
 }  

2.Use the below method where click on the "upload" button.

 private void UploadFilestoSharePoint(Stream fs, string sFileName, Guid id, string filetype)  
 {  
 string fileid = id.ToString();  
 // if you want to specialize the application type  
 string applicationtype = filetype;  
 //This is the SharePoint Web url eg "https://test.sharepoint.com"   
 string UploadUrl = sURL;  
 Uri uri = new Uri(UploadUrl);  
 string sSPSiteRelativeURL = uri.AbsolutePath;  
 SharePointUtil sputil = new SharePointUtil();  
 bool bbConnected = sputil.Connect(UploadUrl);  
 if (bbConnected)  
 {  
 sputil.UploadFile(fs, sFileName, sSPSiteRelativeURL, fileid, applicationtype);  
 }  
 }  

Wednesday, October 12, 2016

How to Remove the "Title" Field from our Forms and the Default View in SharePoint

1. Go to the list and choose Settings | List Settings

2. Click "Advanced settings"

3. Change the first entry, "Allow management of content types?" to Yes

4. In the “Content Types” section that has just appeared, click the "Item" link

5. Click the "Title" field and select “Hidden (will not appear on forms)”

6. Change the management of content types back to “No” (steps 1-2)

Tuesday, May 24, 2016

Display Repeated Events in a Calendar in SharePoint 2013

1.Select the Calendar which you need to show the items. Then select “List Settings” in the calendar tab.


2.Click on the “Create Column”

3.Create two calculated columns which we can use to save the Start Time and the End Time (as below).

*Please create two columns for both Start Time and End Time

4.Now go to the page where display the “What’s on today” web part. Then Click on edit to edit the page.

5.After that edit the “What’s on today” web part.


6.Then set the rules as below.

Here select the calendar which you need to show the events.
Eg : According to yours “Events”


7. Save the changes.

Thursday, November 12, 2015

Business Intelligence with SharePoint

  •    SharePoint -  Excel Service , Visio Service, PerformancePoint Service
  •    Microsoft Excel – Excel, Power view, PowerPivot
  •    SQL Server – Integration with the SQL Reporting Service
  •    Third Party Tool – Power BI 

Comparison Business Intelligence Capabilities in Different Microsoft SharePoint Environments  

Feature
SharePoint On-Premise
SharePoint Online Plan 1
SharePoint Online Plan 2
BI Center
Yes
No
Yes
Excel Services
Yes
No
Yes, if the workbook size less than 10 MB
Visio Services
Yes
No
Yes
PerformancePoint Services
Yes
No
No
PerformancePoint Services (PPS) Dashboard Migration
Yes
No
No
Power View for Excel in SharePoint
Yes
No
Yes
PowerPivot for Excel in SharePoint
Yes
No
Yes
Scorecards & Dashboards
Yes
No
No
PivotTables and Pivot Charts
Yes
No
Yes
Filter Enhancements and Filter Search
Yes
No
Yes
Schedule Data Refresh
Yes
No
No
Usage Monitoring
Yes
No
Yes
Reporting Services integration With SQL
Yes
No
No

Moreover we can use Power BI (Payable app) for office 365.It provides below features.
  • Can create BI sites and called them as “Power BI sites”.
  • Provide data stewardship and query sharing and management.
  • Can schedule Data Refresh.
  • Provide Natural Language Query (Q&A).-(not provide in any other environments)
  • Provide predictive forecasting.(not provide in any other environments)
  • View Microsoft Excel workbooks in a browser.( if the workbook size less than 250 MB)
  • Usage Monitoring.
  • Cannot use for Excel Power view and PowerPivot workbooks.
References
https://msdn.microsoft.com/en-us/library/dn877942%28v=sql.120%29.aspx
https://technet.microsoft.com/en-us/library/sharepoint-online-service-description.aspx#bkmk_tablespo
http://www.sharepoint.co.il/sites/share-point/UserContent/files/Appendix_B.pdf
https://msdn.microsoft.com/en-us/library/dn877942%28v=sql.120%29.aspx